SECTION 07 · Setup Guides
VESA Mount Sizes, Explained Before You Buy
Four screw holes on the back of a monitor decide whether an arm fits. Here is how to measure the pattern, read a weight rating honestly, and spot the traps that void the fit.
We earn a commission when you buy through our Amazon links, at no extra cost to you. It never affects our rankings, and we say so when the cheaper product is the better buy. How this works.
VESA is the reason you can put almost any monitor on almost any arm, and it is also the reason a small minority of monitors will not go on any arm at all. The standard itself is unglamorous: a square or rectangular pattern of four threaded holes on the back of a display, at agreed spacings, so mounts and panels from different manufacturers fit each other. Everything that goes wrong with mounting a screen comes down to four questions about that pattern and the metal around it, and all four are answerable in about a minute with a tape measure.
This is the reference page for the two roundups where the question keeps coming up — single monitor arms and dual monitor arms— so you can check compatibility before you spend rather than during the return window.
What the numbers actually mean
A VESA size is written as two numbers in millimeters: the horizontal spacing between hole centers, then the vertical. 100 x 100 means the four holes form a 100mm square. 200 x 100 means they form a rectangle 200mm wide and 100mm tall. The numbers describe hole centers, not the size of the plate, the screen, or anything else — which is why measuring between the outer edges of the holes gives you a slightly wrong answer and measuring center to center gives you the right one.
The sizes you are realistically going to meet on a desk monitor are a short list. 75 x 75 appears on small and light panels, typically under about 24 inches. 100 x 100 is the overwhelming default for desk monitors and what nearly every desk arm ships to fit. 200 x 100 and 200 x 200 turn up on large or heavy panels, including some 32-inch and larger displays and many televisions. Larger patterns exist above that, but they belong to wall mounts and screens far past desk scale.
Most desk arms are sold as fitting 75 x 75 and 100 x 100, and the good ones include a plate with both patterns drilled. If your monitor is 200 x 100, you do not need a different arm so much as an adapter plate that presents a 100 x 100 pattern to the arm and bolts to the 200 x 100 holes on the panel — provided the arm’s weight rating covers the heavier screen, which is usually the real constraint.
How to measure yours in ten seconds
Look at the back of the monitor. If it has a removable stand, the four holes are frequently hidden behind it, so pop the stand off first — most release with a button or a single screw. You are looking for four threaded holes in a square or rectangle, usually near the middle of the panel.
Measure from the center of one hole to the center of the hole beside it for the horizontal number, then center to center vertically. If both come out near 100mm, you have 100 x 100. Near 75mm both ways, 75 x 75. If the horizontal is roughly double the vertical, you are looking at 200 x 100. The spacings are far enough apart that you do not need precision — nothing sits between 75 and 100, so a rough measurement is decisive.
Note the screw thread as well. Smaller patterns typically use M4 screws and larger ones M6 or M8, and arms ship with an assortment. The failure mode here is length rather than diameter: a screw that is too long bottoms out before it clamps, and on some panels it can reach the electronics behind the mounting boss. If the supplied screws will not tighten, use the spacers in the box rather than forcing them.
Trap one: the weight rating is a range, not a maximum
Gas-spring arms are the ones worth having, and they work by balancing the screen’s weight against a spring you tension to match. That means they have a minimum as well as a maximum. A very light panel on an arm rated for heavy screens will drift upward and refuse to stay where you put it, even at the spring’s lowest tension — the same failure as overloading, in the other direction.
Weigh the monitor without its stand, since the stand is often a large fraction of the boxed weight and does not come along. Then check that the figure lands inside the arm’s stated range with a little room at each end. On a dual arm, check whether the rating is per arm or for the pair; manufacturers state it both ways, and reading a per-pair number as a per-arm number is a common way to end up with two sagging screens.
Trap two: depth, curve, and the clamp
A pattern that matches does not guarantee a fit. Three physical details decide the rest. The first is how deeply the holes are recessed: some panels sink the mounting boss into a hollow, and an arm’s plate has to reach into it. Where it cannot, a spacer kit solves it, and better arms include one.
The second is curvature. A curved panel has a curved back, so a large flat mounting plate may contact the panel before the screws seat. Arms sold as curved-compatible use a smaller or shaped plate for exactly this reason, and it is worth checking if you are mounting a 34-inch or wider curved screen.
The third is the desk end. A clamp needs an unobstructed edge and a worktop within its thickness range, and the two things that defeat it are a desk with a lip or a frame rail right at the back edge, and a top thicker than the clamp opens. A grommet mount is the alternative where the clamp cannot bite. Both matter more on standing desks, whose frames often run steel exactly where you wanted the clamp to go.
Trap three: the monitor with no VESA pattern
A meaningful minority of consumer monitors, particularly slim design-led models and some all-in-one machines, ship with no VESA holes at all. There is no fix that is as good as a real pattern. Adapter brackets exist that grip the panel around its edges or bolt to the original stand’s mounting point, and they work, but they add bulk, they load the panel in a way it was not designed for, and they rarely feel solid.
The honest advice is to treat a VESA pattern as a buying requirement rather than a nice-to-have. If you expect to put a screen on an arm at any point — and on a multi-monitor desk you almost certainly will — check the specification sheet for a VESA line before you buy the monitor, not after.
A short pre-purchase checklist
Before you order an arm, confirm five things: the pattern on the back of your monitor measured center to center; the weight of the panel with the stand removed; that the weight sits inside the arm’s range, per arm if it is a dual; whether your panel is curved or deeply recessed, and whether the arm handles that; and whether your desk edge suits a clamp or needs a grommet. Five checks, one tape measure, and the whole category of mounting problems goes away.
Once the pattern is confirmed, the rest of the decision is about your desk rather than your monitor: thickness at the clamp point, a clear flat strip at the back edge, room behind the desk, and a weight range that brackets your screen. How to install a monitor arm walks through all four and the install order.
Essentials
The small parts that finish the job
Nothing here changes a pick above, and none of it is a considered purchase. These are the cheap pieces that decide whether the expensive one works properly, and the ones people discover they are missing on the day the big box arrives.
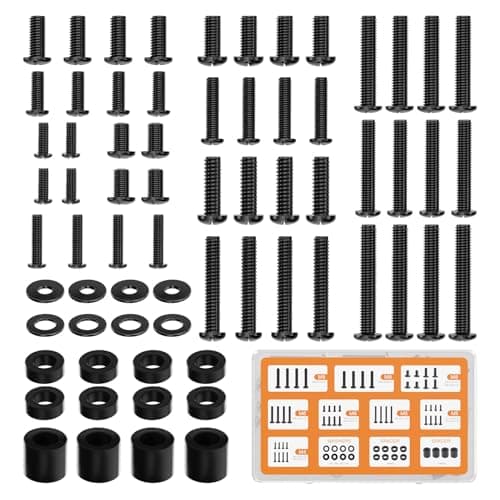
WALI Universal Mounting Hardware Set (M4, M5, M6, M8)
Arms ship with one length of screw. Thick panels, recessed VESA patterns and curved backs regularly need a longer thread or a spacer, and a mixed M4 to M8 kit turns a half-finished install into a ten-minute job.
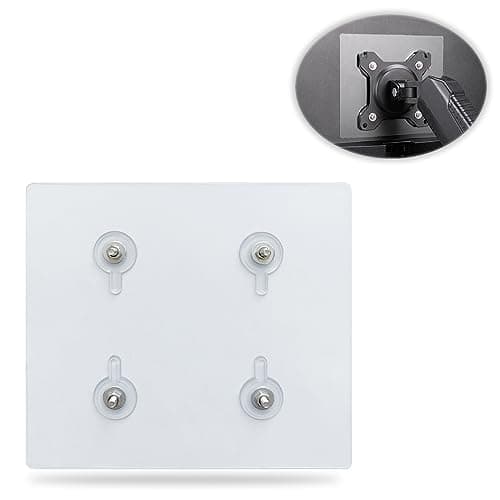
Universal VESA Mount Adapter for Non-VESA Monitors (13 to 27 in)
The part that decides whether an arm is even an option. A panel with no bolt pattern on the back cannot mount to anything, and a bracket kit gives it one instead of sending you back to the stand in the box.
Check first: confirm the adapter's VESA pattern and its panel-size range against both your monitor and your arm, and make sure the arm's weight rating still covers the adapter plus the screen.
#ad · Live prices from the Amazon Product API, as of October 23, 2026. Where we have no verified live price we show none. We may earn a commission, at no extra cost to you.
Questions
Frequently asked
What is the most common VESA size for monitors?
100 x 100mm is the default on desk monitors, and nearly every desk arm is built to fit it. 75 x 75 appears on smaller, lighter panels, and 200 x 100 or 200 x 200 on large or heavy displays, where an adapter plate lets a standard arm take them if the weight rating allows.
How do I know my monitor's VESA size?
Remove the stand if it hides the holes, then measure center to center between adjacent holes horizontally and vertically. Both near 100mm is 100 x 100; both near 75mm is 75 x 75; a horizontal roughly double the vertical is 200 x 100. The sizes are far enough apart that a rough measurement is conclusive.
Can I mount a monitor that has no VESA holes?
Only with an adapter bracket that grips the panel or bolts to the original stand mount, and none of them feel as solid as a real pattern. If you expect to use an arm, treat a VESA pattern as a requirement when choosing the monitor rather than a problem to solve afterward.
Does a gas spring arm have a minimum weight?
Yes, and it catches people out. A gas spring balances the screen against spring tension, so a panel lighter than the arm’s minimum will drift upward and not hold position even at the lowest setting. Weigh the monitor with its stand off and aim for the middle of the stated range.
Will a standard arm fit a curved ultrawide?
Usually, but check the plate. A curved back can contact a large flat mounting plate before the screws seat, which is why arms intended for curved panels use a smaller or shaped plate. Weight is the other issue — wide curved panels are heavy, and many exceed a budget arm’s rating.
Keep reading
Related
- The Best Triple Monitor MountsThree panels means three patterns to check.
- Monitor Arm vs StandWhether the arm is worth it before you shop for one.
- Best Monitor Arms for UltrawidesStandard arms are not rated for a 34-inch-plus panel.
- The best monitor armsSingle-screen arms, with the patterns and ratings each one takes.
- The best dual monitor armsWhere the per-arm versus per-pair weight rating really matters.
- How high should your monitor be?What you are mounting the screen to achieve in the first place.
- The best monitor risersThe answer when the panel has no VESA pattern at all.
Receipts
Sources
- VESA — standards overview
- Flat Display Mounting Interface (technical overview)
- Ergotron — monitor mounting resources
- OSHA — Computer Workstations eTool: monitors
We do not run a testing lab, and we do not pretend to. Specifications come from the manufacturer or retailer listing; the footprint and clearance math is ours and reproducible. Where we could not verify a number, we say so on the page rather than quietly leaving it out. Read our full method.